Wait but Why?
My journey with the Coderslab coding boot camp is coming to an end. For the final project, I’ve decided to design an online film database parser, implementing RESTful API and turn it into a simple website. If you’re interested, please follow this link to Github, where you’ll find both project source files and detailed description. It should offer only a single functionality – option to select a random movie matching chosen criteria (been ever wondering what to watch this evening?). To spice it up slightly and make myself an opportunity to implement some SQL performance tuning, I decided to deploy the website on an experimental architecture.
My first thought went to Raspberry Pi due to its incredible fan base and an immense amount of high-quality tutorials. Then I remembered that I have a glossy orange Sony Xperia Z3 Compact in my drawer, which works perfectly fine despite screen issues. Android system is based on Linux, so I thought while being more challenging, turning the phone into mobile, waterproof (almost!), the battery-powered web server would be also more satisfying.
The specs
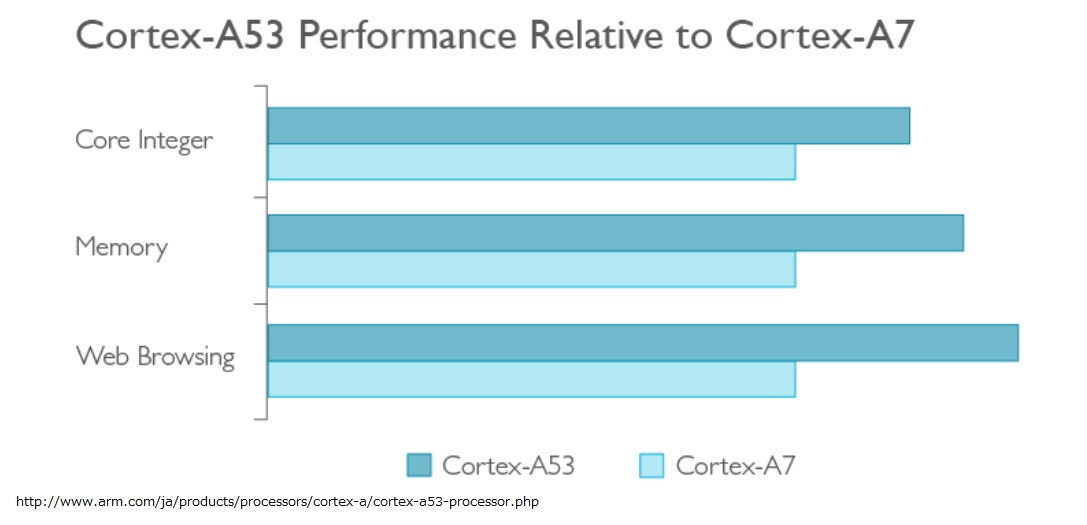
The Xperia Z3 Compact is based on Snapdragon 801 Quad-core SoC running at 2.5GHz at max and 2GB of RAM, while Raspberry 3B uses Cortex-A53 Quad-core 1.2GHz and 1Gb of RAM. It’s quite difficult to compare these two since they represent different architecture though. The main difference is that Cortex-A53 uses 64bit architecture, meaning that can use more RAM and has some additional features. Despite Cortex-A7 architecture being slightly less efficient clock by clock, it’s worth noting that the Xperia Z3 Compact SoC runs at over 2 times higher frequency, which gives it an edge over Raspberry (according to Geekbench Z3 C is almost twice as fast).
The biggest limitation is that none of these two support x86 instructions, so it’s impossible to use a huge chunk of software natively (it’s worth noting there are emulators such as ExaGear desktop but the performance is not quite there yet). Fortunately, the latest Snapdragon – model 835 used in SGS 8, HTC 11, Xiaomi MI 6 and other top-end phones supports x86 instructions natively, so it opens a whole new era in the ARM architecture. From this generation on you can use your mobile phone same way as desktop PC. Ok, enough of the introduction, let’s release the orange beast! 🙂
Please note I do my best to make the whole process of installation as friendly as possible, but since some of the software used is not officially supported, it may freeze, crash, drive you crazy and definitely take you on a bumpy ride. Moreover, you may brick your phone during the process, so please back up your data and be patient and ready to take full responsibility.
Unlocking your phone
To run some of the required software we need a superuser account, a root. Unlocking your smartphone can be tricky, but you may find all necessary information regarding your phone model and the steps required to unleash the power of your equipment on the xda forums. I’m going to guide you through the unlocking process using Sony Xperia Z3 Compact as an example, please use it as a reference. If you already have rooted smartphone, you can go to the second part of the article directly. Ready?

Debug USB
Go to your phone preferences About phone / Software information section and look for Build number. Click it several times, which will add another menu tab to your settings – Developer options. In there look for Debug USB option and turn it on.
Unlocking Bootloader
To do this official way you need IMEI number. I assume you have one. In order to check if your phone is compatible please do the following:
- Open the dialer and enter *#*#7378423#*#* to access the service menu.
- Tap Service info > Configuration > Rooting Status. If Bootloader unlock allowed says Yes, then you can continue with the next step. If it says No, or if the status is missing, you won’t be able to use this way. Luckily, there is a workaround, I’ll lead you to this link.
Important! If you have issues entering recovery mode the usual way, you can use the Android Developer Tools to enforce smartphone to reboot in recovery mode – please download this software and follow this guide.
The usual way 🙂 :
- Turn your device off.
- At the same time, press the Power button and Volume down until your device vibrates.
- Quickly release the Power button, but keep pressing Volume down.
- When you see the screen shown in the image below, release Volume down. You have now successfully entered recovery mode.
Flash Tool
If you own a Sony mobile, there’s a bright side to it! 🙂 Sony offers a solid support for developers and a tool that lets you flash your device called Emma. Go to this link and download software for your system.
Flashing ROM
Please find the official instruction from Sony’s developer webpage (please get familiar with steps and don’t follow them yet):
- Computer: Open Emma from the Start menu of your computer.
- Connect a USB cable to your computer.
- Phone: Turn off your phone.
- Connect your phone to the USB cable while holding the flash key (for example Volume down). The flash key varies between models. For a complete key mapping, see the Sony’s supported phones page.
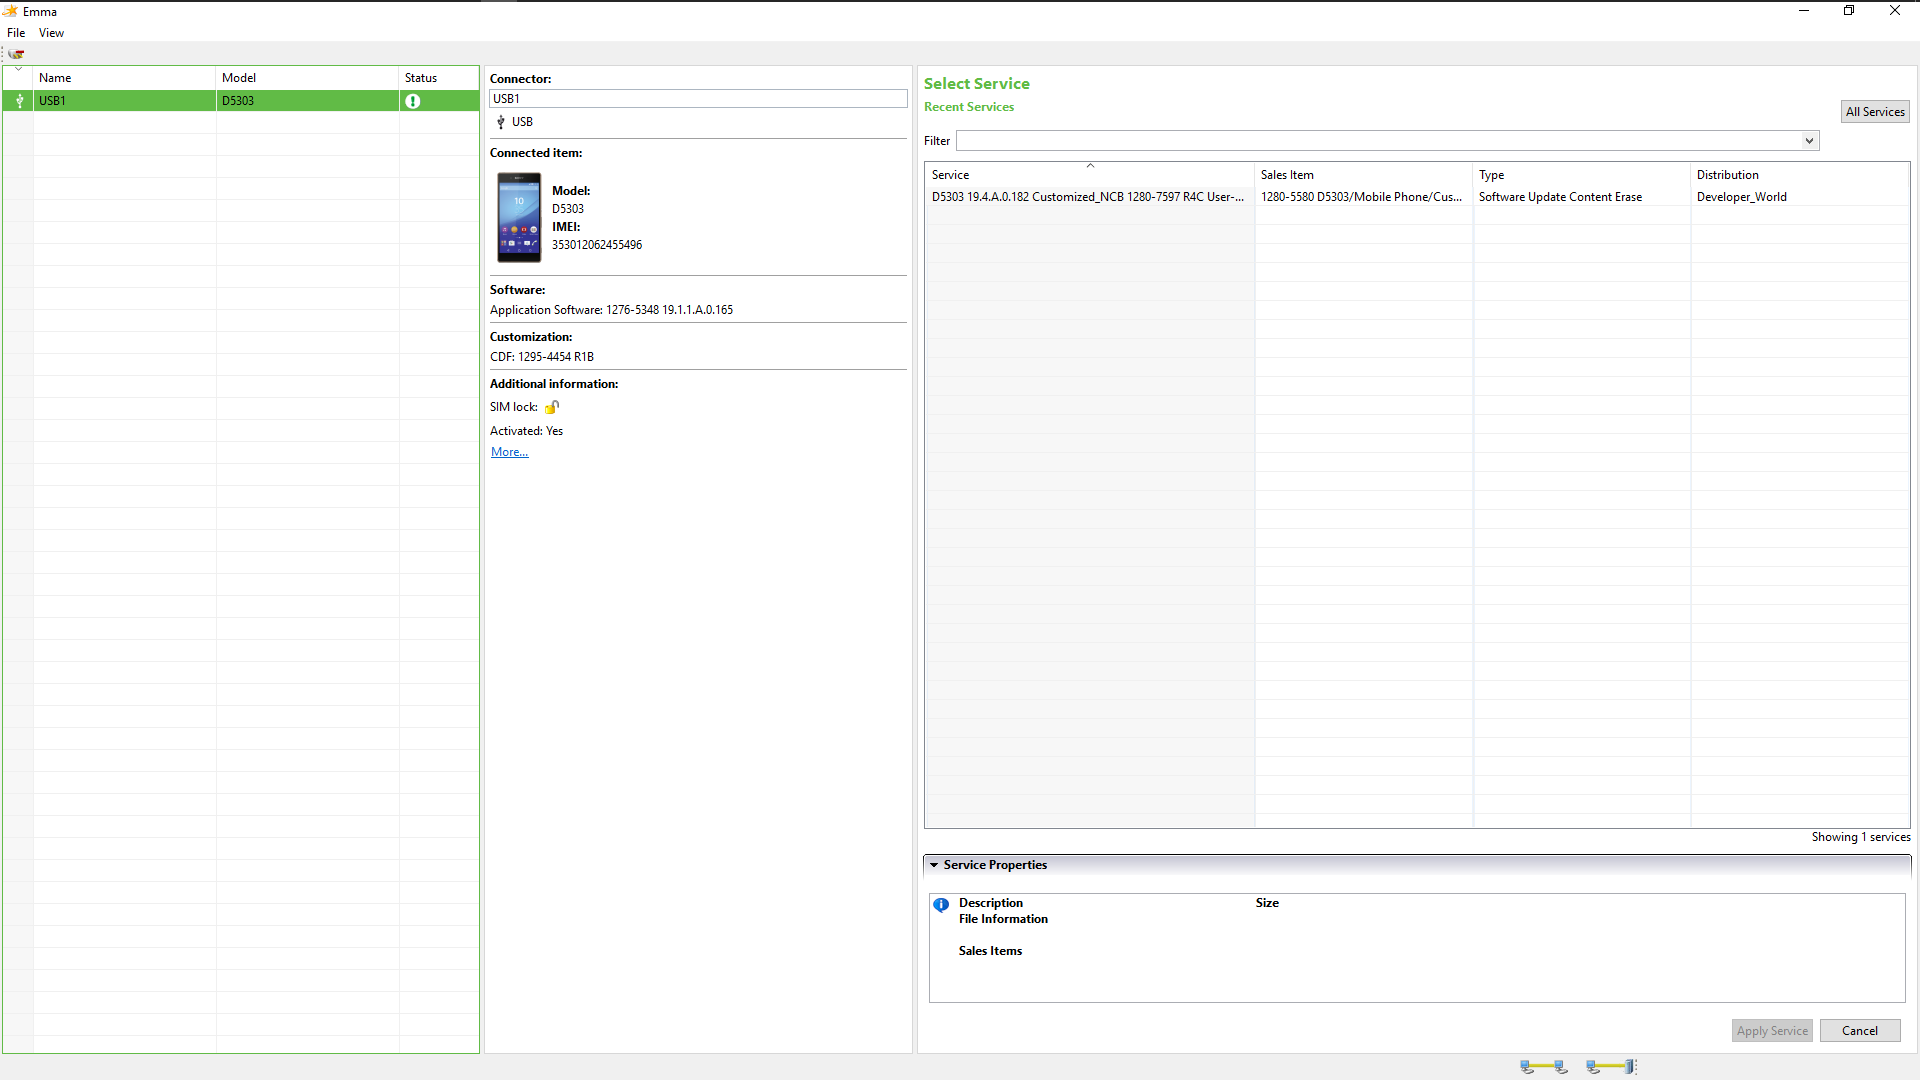
Screenshot showing the flash tool when a phone is connected.
- Computer: Select the software you want to flash in the Service list. The tool automatically detects the phone model and lists available software versions, which are called Services in this flash tool.
- Click on Apply Service. The phone will now be flashed.
- Phone: When you have flashed your device, you can disconnect your phone from the computer. The first time you start your device after you have flashed it, the boot-up might take a little longer than normal.
Please do the following:
- In order to unlock the root, first, you need to flash it to the stock firmware, which has the build number of .575 or .291 using Emma by going through the steps mentioned above.
- Download and install Flashtool for Xperia from http://sony-mobile-flasher.en.lo4d.com/
- Download the .575 Kernel (no need, if your Android Kernel is already .575 version) [LINK]
- Download the .291 Kernel [LINK]
- Download the update_recovery.zip [LINK]
- Download the mm575_recovery.zip [LINK]
- Download the SuperSu.zip [LINK]
- Rename kernel575.zip to kernel575.ftf
- Copy ftf file to the .flashtool/firmwares folder
- In flashtool:
- Click on the thunder icon.
- Choose “flashmode”.
- Select the ftf you’ve just copied.
- Click “flash” and wait for pop up telling you to connect your phone.
- Plug in your device by holding the volume down button.
Note:
If you don’t have the required flashmode drivers in flashtool, click on \Flashtool\drivers\Flashtool-drivers.exe and select installation of drivers for Flashmode, Flashtool and your device.
As those drivers are unsigned, before being able to run \Flashtool\drivers\Flashtool-drivers.exe successfully, you need to enable the installation of unsigned drivers to windows 10. Please take a look here if you need assistance.
Now the rooting:
- Copy SuperSu.zip to your phone internal memory or to the phone SD
- Extract recovery_for_mm575.zip and to your computer
- Plug phone to the computer
- Run install.bat from recovery_for_mm575 as administrator
- When finished, reboot your phone to custom recovery
- In custom recovery, install the supersu.zip you’ve previously copied to your phone
- Reboot your phone
- Now you have root access.
- Go back to recovery and flash “update_recovery.zip” to update the recovery
Flashing the original Kernel:
- Flash kernel .291 with Flashtool :
- Rename kernel291.zip to kernel291.ftf
- Copy ftf to the .flashtool/firmwares folder
- In flashtool:
- Click on the thunder icon.
- Choose “flashmode”.
- Select the ftf you’ve just copied.
- Click “flash” and wait for pop up telling you to connect your phone.
- Plug in your device by holding the volume down button.
Summary
Your phone should be up and ready with super user priveledges. How to check if you have root privileges? The simplest way is to download one of the apps that verify the access or any Android terminal and try to elevate the user rights by using the command “su”. If you’ll see the # sign in the command line, you have root access. 🙂

In the next part I’m going to describe how to:
- install Linux distribution of your choice
- stream your Linux screen to a device of your choice
- configure Apache web server
- configure MySQL lite db server
- install PHP7, install git, composer and prepare the environment
- import and setup the project in Symfony 3
- Troubleshoot the most frequent issues
See you soon and thanks for reading!
