Welcome to the second part of the tutorial, in which I’ll show you how to deploy a LAMP stack on your droid smartphone. Here’s the link to the previous part.
Rule of three
As far as I’m concerned there are three ways to launch a web server on the android device.
First and the most challenging is to install Linux natively. This would require native drivers for your smartphone, as the android layer would be wiped out totally. I’ve seen some examples of such ports of HTC devices, however, I was unable to find any materials for my Xperia or other brands. If you’ve heard about such projects, don’t hesitate and let me know.
Alternatively, you can install one of the web server apps, that emulate the environment and let you use the AMP stack such as PAW Server, KSWeb, BIT Web Server or any other. The advantage of this solution is that you don’t need to root your device. You can have a preconfigured environment waiting for deployment in a blink of an eye. The downside is that you don’t have the flexibility of Linux machine, ability to install any additional software, get the latest version of PHP, Apache2, SQL. Also, it lacks configuration options.
The third option and the one I went for is to use rooted device along with Linux Deploy, Busy Box (you’ll have this one already installed if you followed the first part of this tutorial) and Remote VNC for streaming the Linux desktop. Basically, it lets you create a virtual machine running a distribution of Linux of your choice. It seems to be the best of two worlds: you can use everything Linux has to offer and don’t have to worry about the drivers. Surely it won’t run so smoothly as a native installation would, but the performance is ok for most of the needs.
Deploying a distribution of Linux of your choice
First install BusyBox – it gives your phone access to the Linux commands required by the Linux Deploy virtual machine. Once you install it, you do not have to worry about it.
Open Linux Deploy and make sure it has administrator privileges. Now press the small download button in the top or bottom corner of the screen. This will take you to the options menu. Most of the settings here can be left as they are, you can choose the Linux distribution. Everything is here – from Debian and Ubuntu to Kali Linux, Gentoo, Fedora and others. Each distribution has its own quirks and fans. One difference worth noticing is that there are two packages standards – DEB and YUM. In most cases it’s not a huge difference, however unless you own a Snapdragon 835 or newer, your software packages will be limited to the ones based on x64 libraries. For the sake of this tutorial, I went for Ubuntu which uses apt manager for DEB packages.
Next you should choose an installation directory and set the size of virtual machine image. This is important because by default the image size is set to 2GB, while the system files can take up to 1.6GB, leaving you with 400MB for your experiments. In case you use fat32 file system on your device/sdcard the max size you can use is roughly 4GB. If you’re lucky and your device is able to read ext4 cards, then you’ll be limited to 16TB per image or rather the card capacity.
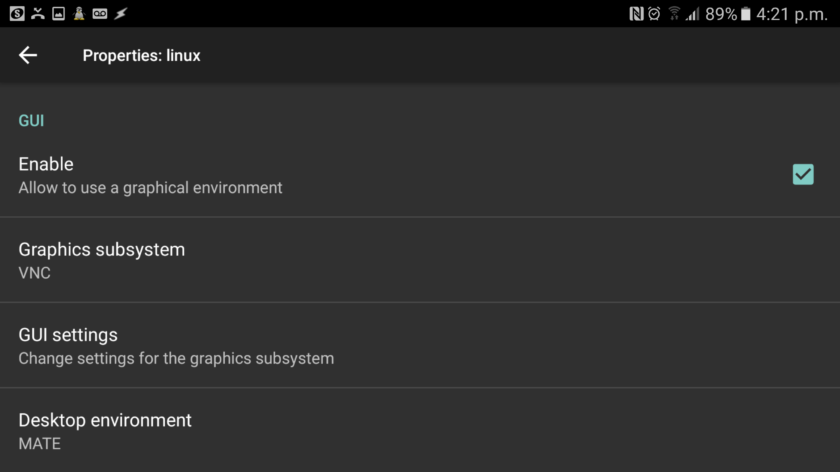
Next under the GUI category tick enable under GUI to ensure you have a graphical interface to work with and check out the GUI Settings. Choosing the resolution is up to you. I’d suggest to set it to either your smartphone default resolution in case you’ll display it on a smartphone or to the native resolution of any external screen you want to use. Set your username to ‘root’ to give yourself privileged access and make a note of the password.
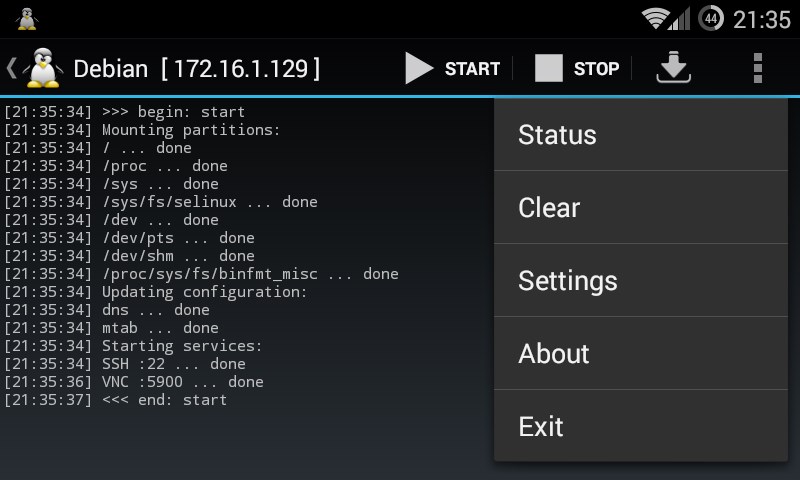
Now click the menu that looks like three dots and click ‘Install’. This will take a little while but will install the entire Linux distro on your device. Click the ‘Start’ button to run it in ‘chroot’ – essentially a small sub-compartment on your device. Finally, you’ll use VNC Viewer in order to actually view the GUI. Load it up and set the address to ‘localhost:5900’. Then enter the password that you set earlier. You can either install VNC on your smartphone or desktop just as you’d use any remote desktop. In case you’d want to stream the Linux desktop to your smartphone directly, you need a USB to MicroUSB OTG cable and a set of keyboard and mouse for convenience.
Installing LAMP
First, make sure you’re logged as root. If you set the user to root in the previous step, most likely you would. If not, elevate user privileges by adding ‘sudo’ word before all commands from this chapter. Next, ensure your system and apt package lists are fully up-to-date by running the following:
apt-get update -y && apt-get upgrade -y
The -y flag tells apt to go ahead and update the system without prompting you. Next you’ll need some kind of text editor. Personally I used nano, but actually any is going, to be fine. It’s up to your preference.
apt-get install nano -y
OR:
apt-get install gedit -y
PHP 7
apt-get install python-software-properties
add-apt-repository ppa:ondrej/php
apt-get update
apt-get purge php5-fpm
apt-get install php7.0-cli php7.0-common libapache2-mod-php7.0 php7.0 php7.0-mysql php7.0-fpm php7.0-mysql
apt-get install php7.0-cgi php7.0-dbg php7.0-dev php7.0-curl php7.0-gd
apt-get install php7.0-mcrypt php7.0-xsl php7.0-intl
After the installation is complete, restart Apache2:
service apache2 restart
And verify if the PHP7 installed correctly:
php -v
Apache2
Please run for the standard Apache installation
apt-get install apache2
or in case you don’t want to use the php-fpm package:
apt-get install apache2 libapache2-mod-php -y
Check if the Apache is running:
service apache2 status
If not, try to start it manually:
service apache2 start
Apache2 enable mod_rewrite
sudo a2enmod rewrite
sudo service apache2 restart
Then open the configuration file:
nano /etc/apache2/apache2.conf
AllowOverride None to AllowOverride All
<Directory /var/www/>
Options Indexes FollowSymLinks
AllowOverride All
Require all granted
</Directory>sudo service apache2 restart
MySQL
apt-get install mysql-server -y
mysql_secure_installation
Follow the prompts as below:
- Would you like to setup VALIDATE PASSWORD plugin? press Enter here for No
- Please set the password for root here. New password: Type a secure password here then press Enter
- Re-enter new password: Re-type the secure password here then press Enter
- Remove anonymous users? (Press y|Y for Yes, any other key for No) : press y and then Enter here
- Disallow root login remotely? (Press y|Y for Yes, any other key for No) : press y and then Enter here
- Remove test database and access to it? (Press y|Y for Yes, any other key for No) : press y and then Enter here
- Reload privilege tables now? (Press y|Y for Yes, any other key for No) : press y and then Enter here
Then try to start mysql service:
service mysql start
You log into the client by running:
mysql -u root -p
To find port mysql is listening at just log into the client the type:
SHOW GLOBAL VARIABLES LIKE ‘PORT’;
If it works, well done! If not, check the error log in console or at /var/log/mysql/error.log. Some of the most frequent issues are:
- Cannot touch ‘/var/log/mysql/error.log’: Permission denied
This means the MySQL process cannot access logs directory, you can fix it by running:
chown -R mysql /var/log/mysql
…or any other mentioned catalog in the log. If that doesn’t help, try setting the access rights by running CHMOD -R 777 for given directory and gradually decrease the rights.
- ERROR: The partition with /var/lib/mysql is too full!
Check if you have any free space on the partition, if you do and the error persists, try changing the owner of the catalog recursively as in the previous example.
- ERROR 2002 (HY000): Can’t connect to local MySQL server through socket ‘/var/run/mysqld/mysqld.sock’ (111)
Firstly, you can try going to /etc/mysql/my.cnf and change ‘bind-address’ parameter to ‘localhost’ or ‘127.0.0.1’. Sometimes the Android kernel can be compiled with CONFIG_ANDROID_PARANOID_NETWORK setting. This allows only certain users to use the device network i.e. users that belong to hardcoded groups –
aid_bt
aid_bt_net
aid_inet
aid_net_raw
aid_admin
To fix it add mysql user to one of the groups:
usermod -a -G aid_inet,aid_net_raw mysql
Well done, you have a working web server! 🙂 Just put your project in the var/www/html catalog or define your own in the etc/apache2/sites-enabled configuration file. To find your IP address, to which you can connect from outside devices, run the following command:
ifconfig | grep inet

Can you please explain how did you pass the error: ERROR 2002 (HY000): Can’t connect to local MySQL server through socket ‘/var/run/mysqld/mysqld.sock’ (111).
I am not being able to pass it with steps provided.
Thanks
Hey, that error can be a pesky one. First check if the file mysqld.sock exists. Does the error happen when you try to start the mysql service? You can try elevating provieledges using sudo service mysql start
If the solutions in the article didn’t solve your issue, you may try the suggestions from stack:
https://stackoverflow.com/questions/11657829/error-2002-hy000-cant-connect-to-local-mysql-server-through-socket-var-run
https://stackoverflow.com/questions/34265416/cant-connect-to-local-mysql-server-through-socket-var-run-mysqld-mysqld-sock
https://stackoverflow.com/questions/11990708/error-cant-connect-to-local-mysql-server-through-socket-var-run-mysqld-mysq
how about getting the web server to listen to 0.0.0.0 address. ie accessible via internet