
Handling lists of parameters in SQL
During development you might want to pass a list of entities to a query or command. The recommended and safest way is to wrap every item in a parameter and pass it to the query. The problem is that the number of parameters that can be passed to a user function, stored procedure or even dynamic query is limited. The first two are set to 2100 entries per documentation. The third can vary based on the sql server version and the size of the actual parameters. In Sql Server 2008 it’s 65,536 * size of the network packet.
There are numerous way of dealing with this and I’ll describe two possible solutions and one how to not do this, so let’s start.

How to make scrum planning meetings less useless?
Scrum methodology seems to conquer the project management in IT, outmatching classic waterfall solutions. While being agile, flexible and closer to the goal through the process, it’s easy to lose track of the agile manifesto.
One of the basic pillars of scrum is planning. By definition, it is an event in the framework where the team determines the product backlog items they will work on during that sprint and discusses their initial plan for completing backlog items.
I’ve seen scrums you people wouldn’t believe. Attack ships on fire off the shoulder of Orion. I watched C-beams glitter in the dark near.. oh wait, it’s not this kind of dark fantasy.
Let’s see how to make the scrum meetings more meaningful!

Is Introduction to Algorithms a good starter?
There are many different approaches to learning algorithms and data structures. However, I’d divide those into two sets: theoretical and practical with all kinds of in-betweens. When I faced this dilemma, I noticed that the most often called title was the famous Introduction to Algorithms by Thomas H. Cormen, Charles E. Leiserson, Ron Rivest, and Clifford Stein. Reading and working through this book took me three months. Let me answer the given question: is Introduction to Algorithms a good starting book for learning algorithms and data structures?
8 questions to ask yourself before diving into a new task
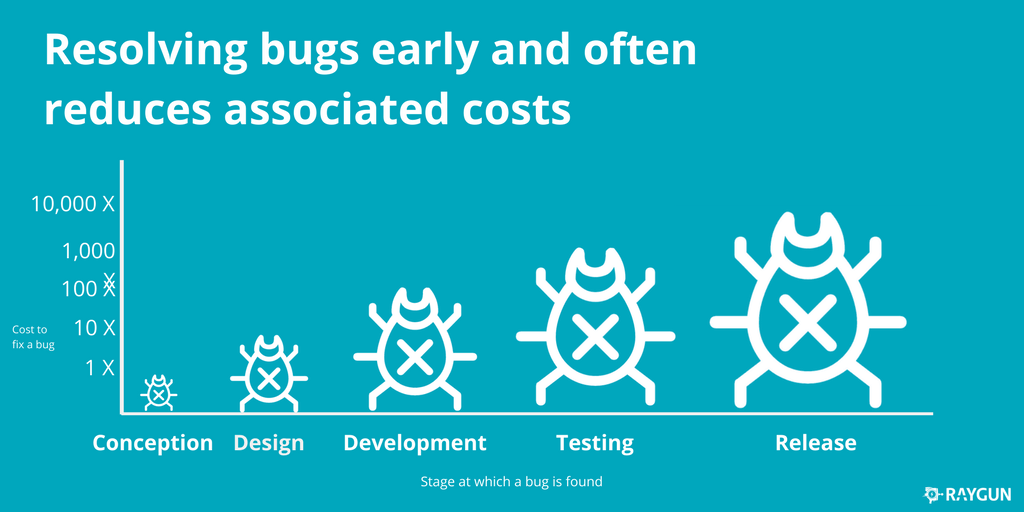
Most of the researches regarding the cost of software errors, show that there is an order of magnitude difference between the stages, where the error is found. That’s why it’s essential to take your time during the planning and prepare a detailed implementation plan for the more complex tasks. I created a personal checklist, which I use before starting a new task. Some of the steps may seem rather obvious, but it’s always worth to keep them in mind. Let’s grab a cup of coffee and enjoy the lecture :).
Best of prey problem
The problem:
There are a number of animal species in the forest. Each species has one or more predator that may be direct or indirect. Species X is said to be a predator of species Y if at least or of the following is true:
- Species X is a direct predator of species Y
- If species X is a direct predator of species Z, and Z is a direct predator of Y, then spec is an indirect predator of species Y.
Indirect predation is transitive through any numb of levels. Each species has a maximum of 1 direct predator. No two species will ever be mutual predators, and no species is a predator of itself. Your task is to determine the minimum number of groups that must be formed to so that no species is grouped with its predators, direct or indirect. As an example, consider an array where each position represents a species and each element represents a predator of that species or-1 if there are none. The array is a [-1, 8, 6, 0, 7, 3, 8, 9, -1, 6, 1] and we’ll use zero indexing.
0              8
 \            / \
  3          1   6
   \        /   / \
    5     10   2   9
                    \
                     7
                      \
                       4
These are the trees created based on the given array.
The groups will be: [0,8], [3,1,6], [5,10,2,9], [7], [4]
We can notice that the asked number of groups without predators is, in fact, the depth of the longers tree branch. Let’s move on directly to the solutions:

Good will hunting
Today was a sunny day, the one that makes you thrive for a beer, mint lemonade or an intergalactic crash, just like the one ending von Trier’s Melancholy. And in the middle of the heat, meditating like Kirsten Dunst on a green meadow, something just struck me. An idea.
Maybe partly it was caused by the third episode of the new Black Mirror season I’ve seen last night. It wasn’t really up to the standard the viewers were used to, myself included. Frankly, the plot was dry as a salt lake, the distance in quality from San Junipero should be expressed in light years, and it was night and night even compared to Hang the DJ. Just a teenage flick about bloodsucking business which creeps everywhere where big money is put at stake. To make thing interesting it gravitated around Miley Cyrus’ career…
How to sort an array of objects by a property value with priority in JavaScript?
User case: data should be sorted by custom values, which don’t make logical order. Look at the following data:
const list = [
  { category: 'tv', price: 1400 },
  { category: 'smartphones', price: 590 },
  { category: 'notebooks', price: 1500 },
  { category: 'smartphones', price: 350 }
]
We would like to sort the objects in the following order: smartphones, notebooks, anything else and have no control over the order data is fetched. First, we need to create an object with that is going to hold priorities:
let sortingOrder = {
    'smartphones': 1,
    'notebooks': 2
}
We are going to use standard array sorting method from the prototype, but need to write a comparison function. Let’s make it take the property name and sorting order as parameters, so it can be reused.
function compare(key, order = 'asc') {
    return function (a, b) {
        if (!a.hasOwnProperty(key) || !b.hasOwnProperty(key))
	    return 0;

	const first = (a[key].toLowerCase() in sortingOrder) ? sortingOrder[a[key]] : Number.MAX_SAFE_INTEGER;
	const second = (b[key].toLowerCase() in sortingOrder) ? sortingOrder[b[key]] : Number.MAX_SAFE_INTEGER;

	let result = 0;
	if (first < second)
	    result = -1;
	else if (first > second)
	    result = 1;
	return (order === 'desc') ? ~result : result
    };
}
We use the comparator function to determine the order from keys. Number.MAX_SAFE_INTEGER is used to be sure note specified elements are always last in undetermined order and we are free to extend sortingOrder object. Finally, (order === ‘desc’) ? ~result : result inverts the comparison result for descending order. Lastly, we sort the array as follows:
list.sort(compare('category'));
// OR
list.sort(compare('category', 'desc'));SQL ordered insert from bulk
Bulk insert is one of the best SQL features whenever performance is needed. It’s simple and straightforward, the order of data in a table is retained from the file. However, what if we have already defined import files and would like to feed data from the bulk table in an ordered manner, without modifying files’ structure? To be sure that the ordered will be kept we need to somehow introduce a sorting column.
Io and behold, 3 simple ways to import from temp table and keep entries’ order.
Bulk insert to a view
One way to do this is to modify the original bulk table by adding a primary key. We should always add it in the first position – for two reasons: clarity and ability to extend table columns without dropping whole table.
Note: We’re going to use the simplest example as possible for readability.
First, we create/alter the import table by adding a primary key, which later will be used to determine the order of the insert.
CREATE TABLE ImportTemp(
iId int IDENTITY(1,1),
[City] nvarchar(30)
)
Then we create a view that contains all columns except identity.
CREATE VIEW ImportTempView
AS
SELECT
    city
FROM ImportTemp
Finally simply perform the bulk insert to the view, results will be automatically inserted to the table on which view is based on.
BULK INSERT ImportTempView
FROM 'Q:\cities.txt'; | iId | City |
| 1 | Toronto |
| 2 | New York |
| 3 | Cracow |
| 4 | Warsaw |
Disadvantages?
It requires diving into the code base and adjusting the table, which is targeted during the import. Also, we add an additional abstraction layer plus performance overhead with the view itself.
SqlBulkCopyOptions
We’re going to use the .NET SqlBulkCopyOptions to specify the way import feeds identification data. However, it requires modification of the import files, which can disqualify this solution (no access to the import files, too many templates, etc.).
Example:
public SqlBulkCopyAssistant CreateBulkCopy(string strDestinationTable)
  {
    return CreateBulkCopy(strDestinationTable,  SqlBulkCopyOptions.KeepIdentity);
  }
The SqlBulkCopyOptions.KeepIdentity option when turned on will allow feeding IDs from the import file. However, the import file needs to include ID values. If this option is disabled (bear in mind the SqlOptions use bitwise options), import file STILL needs to has the ID column specified, although it can be empty (letters in bold are just a header):
id, city
,toronto
DataTable and DataColumn
The third and final method is based on .NET methods involving operations on DataView and DataTables.
using (var dataView = _csvDataReader.ReadDataWithHeaders(localFilePath))
    {
       var dataTable = dataView.ToTable();
       dataTable.Columns.Add("iId", typeof(int)).SetOrdinal(0);
       var dataReader = dataTable.CreateDataReader();
      _bulkUploadService.Upload(ProcessImport.LoadTempTableName, dataReader);
    }
Please focus on dataTable.Columns.Add(“iId”, typeof(int)).SetOrdinal(0); line, which is responsible for adding an empty column to the import table in the first position (0). This way we’re going to add a temporary dummy column on the fly and keep import clean without touching import files.
Whichever method you choose, you’ll end up having a temp table with identity column, which is both trivial and efficient to sort.

The Shallow – Nicolas G. Carr
I came by this book by accident. Found it laying on a seat in a coach going to the Italian Alps. I decided to give it a try for two reasons. Firstly, I’ve heard about the book and it struck me it was the finalist of the Pulitzer Prize. Secondly, I noticed increasing difficulty in maintaining attention while reading myself. What I hoped to be a winter romance, ended up as a single serving friend, leaving rather mixed feelings.
Why? The topic itself is really interesting and more current than ever. However, the book seems like an essay extended to absurd lengths. Let me take up the challenge and present all the key ideas from The Shallow in brief nine sentences. Here we go…
The book
In the history of mankind, there were three inventions that overhauled the way we think: the clock, the print, and the web. The human brain is neuroplastic and flexible – the most often we use any particular area, the more it grows its neural connections. Additionally, in case of emergency (accident, surgery), some parts can take responsibility for the others. Because of the amount of information we receive nowadays (study from 2009 showed about 34GB a day) we can notice a shift in the way of thinking. We tend to move from deep, focused and thoughtful sessions to multitasking and information skimming. This drove us toward difficulty with maintaining attention in situations that take more time and don’t flourish with stimulation ex. reading longer text forms. Finally, we started treating smartphones as extensions of our brain. It lets us store data, notifications, dates, guide us through a new town and much more. Since it reliefs brain from those tasks, it has a side effect of decreasing neural connections, which leads to difficulty in memorization, disorientation etc.
And there it is… I admit Carr did the homework and well documented every theory with convincing levels of example, mostly scientific research. Surely the way people interact with the Internet has changed and treating it as air, from which we breathe information may result in creating a shallower form of intelligence. The curse of abundance – too much data, too quickly, too divergently, too distractedly, too unassociatively, and with too much finality.
Conclusion
Reading The Shallow in 2019 surely won’t open your eyes. The theories became facts. So does the book became obsolete? Yes and no. Yes, because most of the information depicted in The Shallow as shocking is now taken for granted. And no – it’s more actual than ever as we tend to integrate stronger and stronger with mobile devices, constantly being attached to the web. Is this a bad thing though? It doesn’t make much sense to answer that question, it’s just inevitable.

Pro Git – Scott Chacon, Ben Straub
Welcome to the first part of the book project series. Without further ado, let’s get started

Undoubtedly, there are many books about
I picked it a few weeks before the company I work at decided to move from the SVN to GIT, making what’s supposed to be a huge step forward. It turned out it really was.
Through the first 100 pages, Ben explains the concept of git, which is a decentralized versioning system and underlines what distinguishes it from other versions systems i.e. SVN, CVS, and Mercurial. Additionally, the author covers a number of topics: git customization, setting up a git server, or repository migration, which may help you during git initial setup. Chapters are well structured, precise and thrift. Concepts are explained in a clear manner and easy to understand. The book helps newcomers with getting to grips with the concept of distributed work using branches and provides several user stories, which cover most of the daily usages of the versioning system.
It’s a great chunk to start with in order to build a solid base of knowledge. Even readers who are already familiar with the git mechanics may find something interesting and non-trivial like chapters covering the git internals. After reading Pro Git I felt comfortable enough to navigate toward the git official documentation with a lot more courage.
Personally, the most important takeaway was the function called bisect, which I didn’t know existed before reading this book. It got into my mind so deep I decided to immediately put it into action. In case you are not familiar with it, here’s a short explanation from the official documentation:
This command uses a binary search algorithm to find which commit in your project’s history introduced a bug. You use it by first telling it a “bad” commit that is known to contain the bug, and a “good” commit that is known to be before the bug was introduced. Then
https://git-scm.com/docs/git-bisectgit bisectpicks a commit between those two endpoints and asks you whether the selected commit is “good” or “bad”. It continues narrowing down the range until it finds the exact commit that introduced the change.
Using it along automated tests allows to quickly locate the commit that broke it, which may really speed up your work.
Would I recommend the book? Definitely, just bear in mind you can really skip half of it, if you are not interested in the migration, server picking, choosing a communication protocol, or the git internals. Otherwise it’s well worth your time.